
Simple pendulum in TikZ
Easy steps to draw a simple pendulum in LaTeX using Tikz
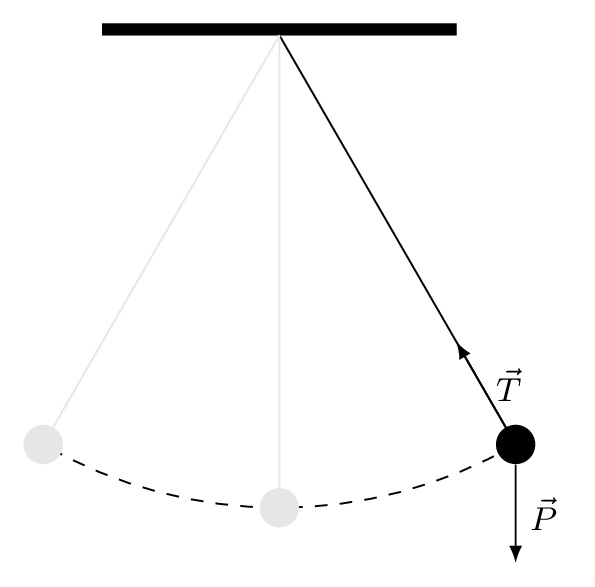
From above illustration, we distinguish 8 parts:
- Support: a rectangle filled with black color
- Bob: a circle filled with black color
- Massless rod: a straight line from the rectangle to the circle
- Two forces: two lines with arrows to highlight weight and tension forces
- Bob's trajectory: an arc with dashed line style
- Two versions of the same pendulum with different angle and with light gray color
Before going into the into the details, let's prepare the LaTeX document with the required package:
\documentclass[border = 0.2cm]{standalone}

% Required package
\usepackage{tikz}

\begin{document}

\begin{tikzpicture}
	% Put the illustration code here!
\end{tikzpicture}

\end{document}
From above, we loaded TikZ for drawing our illustration and we used standalone document class with 0.2cm border to work only on the illustration and remove any extra white margins.
Step 1: Draw the support
Drawing a rectangle can be done using the rectangle operation between the coordinates of the rectangle opposite corners. Here is how we can do it in TikZ:
\documentclass[border = 0.2cm]{standalone}

% Required package
\usepackage{tikz}

\begin{document}

\begin{tikzpicture}

% Support
\draw[fill=black] (-1.5,0) rectangle(1.5,0.1);
\end{tikzpicture}

\end{document}
In fact, the black color is the default one. Hence instead of using [fill=black] we can use [fill]. We can optimize the code a little by using a \fill command as follows:
\documentclass[border = 0.2cm]{standalone}

% Required package
\usepackage{tikz}

\begin{document}

\begin{tikzpicture}

% Support
\fill (-1.5,0) rectangle(1.5,0.1);
\end{tikzpicture}

\end{document}
Step 2: Draw the massless rod with the bob
The massless rod corresponds to a straight line which ends with a small circle filled with black color that represents the bob. The pendulum rotates around the point (0,0) and we will use polar coordinates to draw it. Here is the corresponding code:
\documentclass[border = 0.2cm]{standalone}

% Required package
\usepackage{tikz}

\begin{document}

\begin{tikzpicture}

% Support
\fill (-1.5,0) rectangle(1.5,0.1);

% Rod + Bob
\draw (0,0) -- (-60:4) node[fill,circle](m){};

\end{tikzpicture}

\end{document}
The above code draws a straight line from (0,0) to (-60:4) which is 4cm far from the pivot and makes 60 degrees from the horizontal line. This corresponds to 30 degrees from the vertical line.
At the end of the path, we have added a node of circle shape and filled with black color. For more details, check the post: "TikZ shapes: Circle"

Step 1 + Step 2 of drawing a pendulum
Step 3: Add arrows to represent forces
Drawing an arrow can be achieved by adding one of these options to the draw command: -ArrowHeadName, ArrowHeadName- or ArrowHeadName-ArrowHeadName. For different arrowhead styles, check the post: "TikZ arrows". Here is an example that we will use for the free body diagram of the pendulum:
The LaTeX code of the pendulum with forces is given by:
\documentclass[border = 0.2cm]{standalone}

% Required package
\usepackage{tikz}

\begin{document}

\begin{tikzpicture}

% Support
\fill (-1.5,0) rectangle(1.5,0.1);

% Rod + Bob
\draw (0,0) -- (-60:4) node[fill,circle](m){};

% Weight Force
\draw[-latex] (m) -- node[right]{$\vec{P}$}++(0,-1) ;

% Tension Force
\draw [-latex] (m) -- node[right]{$\vec{T}$}(-60:3);

\end{tikzpicture}

\end{document}

Both force vectors start from the bob which has coordinates named (m). The weight force goes down with 1 cm and the tension force goes in the direction of the massless rod by 1cm.
Step 4: Add light gray pendulum to highlight different positions
This step is a copy paste of step 2 with light gray color option provided to the draw command. One pendulum is drawn at -90 degrees (vertical position) and the other at -120 degrees, both from the horizontal line. Here is the corresponding code:
\documentclass[border = 0.2cm]{standalone}

% Required package
\usepackage{tikz}

\begin{document}

\begin{tikzpicture}[font=\footnotesize]

% Support
\fill (-1.5,0) rectangle(1.5,0.1);

% Rod + Bob
\draw (0,0) -- (-60:4) node[fill,circle](m){};

% Weight Force
\draw[-latex] (m) -- node[right]{$\vec{P}$}++(0,-1) ;

% Tension Force
\draw [-latex] (m) -- node[right]{$\vec{T}$}(-60:3);

% Light gray pendulum
\draw[black!10] (0,0) -- (-90:4) node[fill,circle]{};
\draw[black!10] (0,0) -- (-120:4) node[fill,circle]{};

\end{tikzpicture}

\end{document}

We have added the option [font=\footnotesize] to the tikzpicture environment to set the font size of different labels.
Step 5: Draw bob's trajectory
In this step, we will draw an arc starting from -90 degrees and ending at -120 degrees with a radius of 4cm (length of the rod). For more details, I invite you to check the post: how to draw an arc in TikZ!
Here is the final LaTeX code of the free body diagram of pendulum:
\documentclass[border = 0.2cm]{standalone}

% Required package
\usepackage{tikz}

\begin{document}

\begin{tikzpicture}[font=\footnotesize]

% Support
\fill (-1.5,0) rectangle(1.5,0.1);

% Bob's trajectory
\draw[dashed] (-60:4) arc(-60:-120:4);

% Rod + Bob
\draw (0,0) -- (-60:4) node[fill,circle](m){};

% Weight Force
\draw[-latex] (m) -- node[right]{$\vec{P}$}++(0,-1) ;

% Tension Force
\draw [-latex] (m) -- node[right]{$\vec{T}$}(-60:3);

% Light gray pendulum
\draw[black!10] (0,0) -- (-90:4) node[fill,circle]{};
\draw[black!10] (0,0) -- (-120:4) node[fill,circle]{};

\end{tikzpicture}

\end{document}
Remark: We moved the bob's trajectory before drawing the pendulum (bob+rod) in order to put it on the background.